Japanese page

This module can play simple beeps and user-defined single-note melodies (up to 61 tones).
It supports Grove (I2C) and USB as interfaces.
Part Names

- Status LED
- On:Running
- Flash once: Valid command accepted
- Flash 3 times: Invalid command accepted
- Off: Not running (module power off, during module startup, etc.)
* Commands are still being accepted while blinking.
Included Items
- Board ×1
Communication Specifications
Grove(I2C)
I2C Register Map.pdfUSB Serial communication
Serial Command.pdf
Specifications
- Buzzer Frequency: 100Hz ~ 8kHz
- Interface: USB, Grove compatible connector (I2C) 1
- USB serial communication
- Baud rate: 9600 bps
- Data bits: 8 bit
- Parity: None
- Stop bit: 1 bit
- I2C
- Max communication speed: 400 kbps
- Signal voltage: 3.3 V (5 V tolerant)
- Grove supply voltage: 3.0 V ~ 5.25 V
- USB power supply voltage: 4.75 V ~ 5.25V
- Max current consumption: 30 mA
- Dimensions: W40 x D24.5 x H7 mm
- Miscellaneous
- USB Serial Conversion IC: WCH CH340 2
Update Firmware
See details
What You Need
- Product
- USB Type-C cable
- PC
Required Software
"STM32CubeProg" is required to write to the STMicroelectronics microcontroller on this product. Please download and install it from the following website.
https://www.st.com/ja/development-tools/stm32cubeprog.html
* Registration to myST (free of charge) is required to download this software.
Procedure
- Download the latest version of the firmware from here.
- If there are any USB cables, Grove cables, etc. connected to the product, unplug them all.
- Enter the boot loader mode. While holding down the “BOOT button for firmware rewriting,” insert the USB cable.
- Write firmware from the STM32CubeProg. Follow the instructions on this page to write the firmware.
- Unplug the USB cable.
Documents
Schematics
- v1.0:schematic-v1_0.pdf
Dimensions

DXF file: dimension_dxf.zip
3D CAD Data
STEP file:3d_step.zip
Sample Code
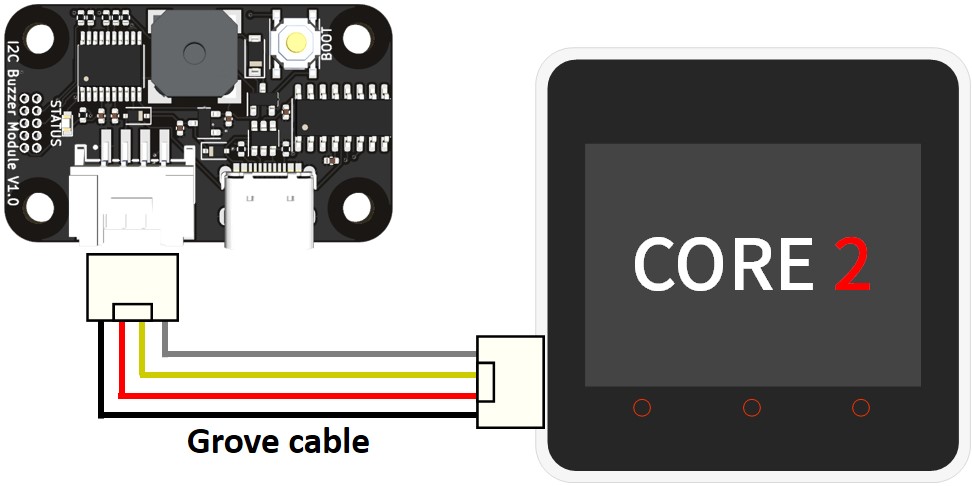
Grove(I2C) of M5Stack Core2
See wiring diagram and sample code
#include <M5Core2.h>

#define BUZZER_I2C_DEV_ADDR	0x16
#define SBEEP_REG_ADDR			0x01
#define CBEEP_REG_ADDR			0x02
#define FREQ0_REG_ADDR			0x04

void setup() {
  M5.begin(true, true, true, true);

  union _16bit_u
  {
    uint16_t uint16_data;
    uint8_t uint8_data[2];
  };

  struct note_t
  {
    union _16bit_u frequency;
    union _16bit_u period;
  };

  M5.Lcd.clear();
  M5.Lcd.setCursor(0, 0);
  delay(500);


  // Simple Beep (1kHz, 50ms, x3)
  M5.Lcd.setFont(FSB24);
  M5.Lcd.println();
  M5.Lcd.println("Simple Beep");
  M5.Lcd.setFont(FSB18);
  M5.Lcd.println("1kHz, 50ms, x3");
  delay(500);
  Wire.beginTransmission(BUZZER_I2C_DEV_ADDR);
  Wire.write(SBEEP_REG_ADDR);
  Wire.write(0b10000111); // 1kHz, 50ms, x3
  Wire.endTransmission();
  delay(2000);


  // Custom Beep (Amaryllis)
  M5.Lcd.clear();
  M5.Lcd.setCursor(0, 0);
  M5.Lcd.setFont(FSB24);
  M5.Lcd.println();
  M5.Lcd.println("Custom Beep");
  M5.Lcd.setFont(FSB18);
  M5.Lcd.println("Amaryllis");
  const uint16_t freqs[] = {784,880,784,1047,784,880,784,880,880,784,880,784,698,659,587,659,523,784,880,784,1047,784,880,784,880,880,784,880,784,698,659,587,523,65535};
  const uint16_t periods[] = {300,300,300,300,300,300,600,300,300,300,300,150,150,150,150,300,300,300,300,300,300,300,300,600,300,300,300,300,150,150,150,150,600,0};
  const int note_num = sizeof(freqs) / sizeof(uint16_t);
  struct note_t notes[note_num];
  for(int i = 0; i < note_num; i++) {
    notes[i].frequency.uint16_data = freqs[i];
    notes[i].period.uint16_data = periods[i];
  }

#define NOTE_BLOCK_SIZE 16  // Write in separate blocks because it cannot write at once.
  int repeat_cnt = note_num / NOTE_BLOCK_SIZE + 1;
  for(int repeat_i = 0; repeat_i < repeat_cnt; repeat_i++) {
    Wire.beginTransmission(BUZZER_I2C_DEV_ADDR);
    Wire.write(FREQ0_REG_ADDR + repeat_i * NOTE_BLOCK_SIZE * 4);
    int buf_i = (note_num > (repeat_i + 1) * NOTE_BLOCK_SIZE) ? (repeat_i + 1) * NOTE_BLOCK_SIZE : note_num;
    int start_num = repeat_i * NOTE_BLOCK_SIZE;
    int end_num = (note_num > (start_num + NOTE_BLOCK_SIZE)) ? start_num + NOTE_BLOCK_SIZE : note_num;
    for(int note_i = start_num; note_i < end_num; note_i++) {
      Wire.write(notes[note_i].frequency.uint8_data[0]);
      Wire.write(notes[note_i].frequency.uint8_data[1]);
      Wire.write(notes[note_i].period.uint8_data[0]);
      Wire.write(notes[note_i].period.uint8_data[1]);
    }
    Wire.endTransmission();
    delay(500); // wait for device ready
  }

  Wire.beginTransmission(BUZZER_I2C_DEV_ADDR);
  Wire.write(CBEEP_REG_ADDR);
  Wire.write(1);  // repeat: x1
  Wire.endTransmission();
}

void loop() {
}